Did you know that you can navigate the posts by swiping left and right?
Building GraphQL API In Node.js
11 Jul 2020
.
12 mins
:
learning
.
Comments
#coding
#experience
#nodejs
#guide
#intern
#internship
#lessons
#programming
#tutorial
This writeup summarises my experience of building a GraphQL API using Node.js and MongoDB. I’ve found it easy to develop APIs that have CRUD operations of fairly medium complexity and do not have many layers of authorization to access data. It is also fabulous how well all three technologies; Node, Mongo, and GraphQL integrate without any issues. You can find numerous articles on advantages of GraphQL over REST and I will be skipping that comparative perspective in the writeup. I’ll also not be getting into how to begin with GraphQL since that is an extensive topic that I feel I’m not capable of writing about.

Background
I’ve been working on a Covid-19 patient management application for hospitals and I found that using GraphQL was a naturally simpler option than writing numerous REST endpoints. The application also has only three levels of authorization; isDoctor, isPatient, and isOwner. This simple distribution allows the usage of GraphQL resolver modifiers and limiting access in a fairly simple manner.
I faced quite some issues in the development process that, with the aim of applying DRY principles, I solved and those solutions will be the primary focus of this write-up. I’ve tried to keep the writing as simple as possible and have included references to understand new terms the first time they are used.
The Base
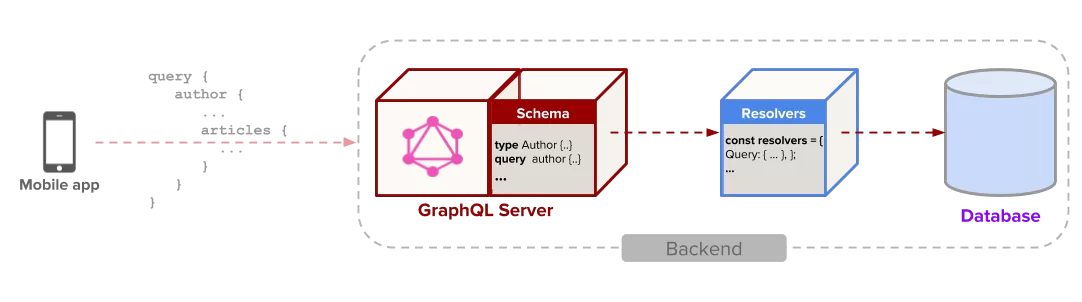
So, at the base of the application, we have mongoose ODM to manage the database connection with the database, ApolloServer as the GraphQL server, Express as the HTTP server and AdminBro as the bare-bone auto-generated admin panel to manage the connected mongo database.
There are other basic modules like node-schedule, morgan etc. to serve purposes like executing periodic functions, logging, securing against known HTTP exploits, etc.
// protect against known http vulnerabilities
app.use(helmet());
// allow cross site requests
app.use(cors());
// support parsing of application/json type post data
app.use(bodyParser.json());
// http request logging
app.use(morgan('dev'));
// compression
app.use(compression());
// to resolve login details, more details in next section
app.use(contextResolver);
I have skipped documentation part above since Apollo comes with iGraphQL playground which is available in development mode and makes it super convenient for frontend developers to interact with the API.
Handling Authentication
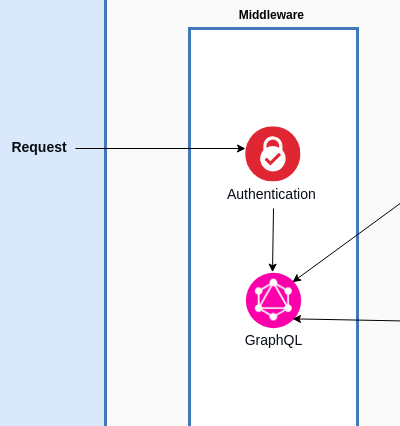
To keep things simple, we have avoided using sessions to manage login and authentication (you DO NOT need any knowledge about sessions for this write-up). A plain approach has been used; the application, on successful verification of users identity (by either password or OTP), generates a signed JSON Web Token that needs to be included in the header in all the subsequent requests and each JWT is valid for 24 hours. The JWT embeds all the information that verified a user uniquely and is decoded in each request and added to the request body; a middleware that decodes the header and adds required elements to request’s body.
var contextResolver = function (req, res, next) {
    const token = req.headers['x-auth'] || req.headers['authorization'];
    try {
        let decodedToken = resolveIdType(token);
        req.isAuth = true;
        req.userId = decodedToken.userId;
        req.userType = decodedToken.userType;
    } catch (err) {
        if (err instanceof TokenExpiredError) {
            console.error('JWT Token expired!');
        } else if (!(err instanceof ForbiddenError)) {
            console.error(err);
        }
        req.isAuth = false;
        return next();
    }
    next();
};
The above code is the middleware (understand more about them here) that checks for the headers, decodes the JWT, and adds it to the request. The two added elements: “userId” and “userType”, are used later by other middlewares to limit access to certain endpoints.
This method provides easy verification since the req object is available to all middlewares in GraphQL.
Know more about handling JWTs in GraphQL implementations on frontend here and backend here. The guides provide a detailed view of more conventional approach on how to perform authentication in GraphQL.
How To Generate The JWT
There can be numerous ways to generate the JWT; GraphQL approach as well as REST approach. I’ve used both in the application depending on which one provides an easier and more verbose implementation. A rule of thumb I follow is, if the authentication is based on fields existing in a model (e.g. username and password), a GraphQL approach is fairly simple with adding mutation and query for login. In cases where login may require credentials not present in model (e.g. OTP), it is better to handle it using REST endpoints.
I found that the fastest way to develop is to be ready to be flexible in using GraphQL and REST both for different purposes as both have their pros and cons.
Writing Models
Writing models with mongoose is fairly straight forward but how to reduce code footprint when your models share a minimal similar structure? For instance, in a lot of models, you’d want to have fields like “created_at”, “last_updated”, “created_by” etc. For this, I curated a function that had a set of pre-defined minimal schema fields and can be extended by passing in more fields.
// The below schema is abstract for deriving schemas which need to store creation details
function CreatorDetailSchema(extension) {
    var schema = new mongoose.Schema({
        created_at: {
            type: Date,
            default: Date.now(),
        },
        created_by: {
            type: mongoose.Schema.Types.ObjectId,
            refPath: 'creator_type',
            required: true,
        },
    });

    if (extension) {
        schema.add(extension);
    }

    return schema;
}
Using the above method to generate schemas [and eventually models] is as simple as using the function in place of the default mongoose.Schema.
const UpdateSchema = CreatorDetailSchema({
    field: {
        type: String,
        required: true,
    },
    val_details: {
        type: String,
        required: true,
    },
});
And there you have a new schema with two new fields alongside three derived fields from CreatorDetailSchema.
This method is pretty useful when you want to reduce code redundancy and want to reflect changes to common fields everywhere at once.
Writing Mutations And Queries
GraphQL works on mutations and queries and I didn’t want to write all the code by myself. This procrastination arose from the fact that most of the mutations and queries are fairly common such as getting an object by it’s Primary Key (e.g. _id) and there had to exist a library to take care of this!
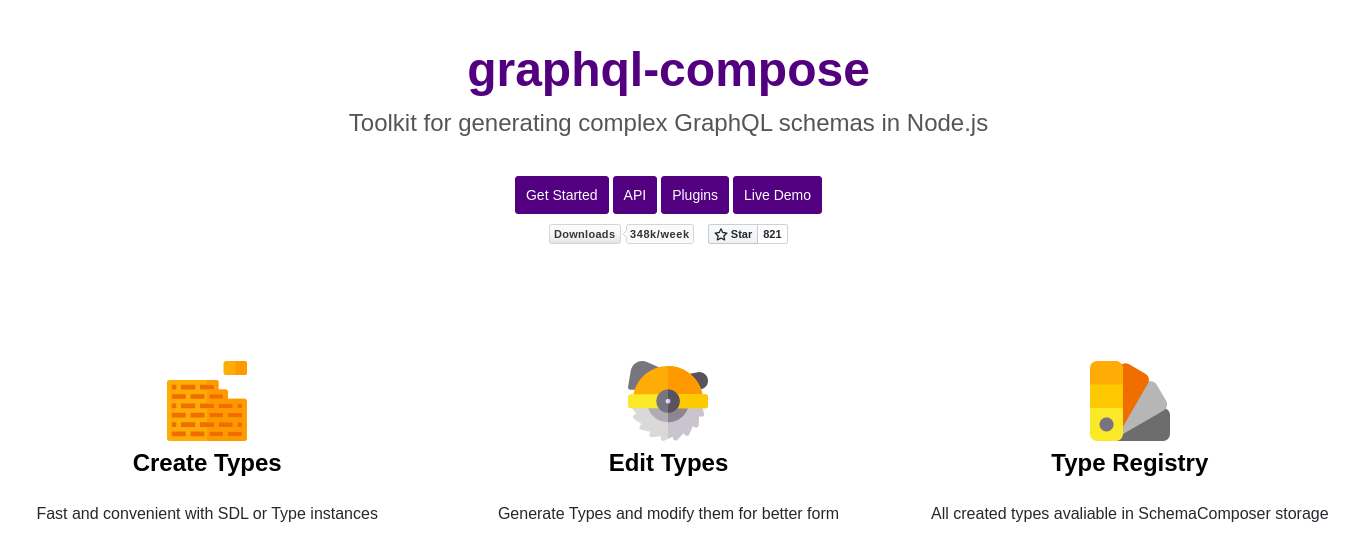
Luckily, there is graphql-compose-mongoose that takes away all the pain of writing mutations and queries by the developer for common operations such as searching by id, updating by id, finding objects, etc. Below is an example of creating all queries for an example model Example with two layers of authentication on its mutations.
const ExampleTC = composeWithMongoose(Example, {});

const ExampleQuery = {
    ExampleById: ExampleTC.getResolver('findById'),
    ExampleByIds: ExampleTC.getResolver('findByIds'),
    ExampleOne: ExampleTC.getResolver('findOne'),
    ExampleMany: ExampleTC.getResolver('findMany'),
    ExampleCount: ExampleTC.getResolver('count'),
    ExampleConnection: ExampleTC.getResolver('connection'),
    ExamplePagination: ExampleTC.getResolver('pagination'),
};

const ExampleMutation = {
    ...requireAuthentication({
        ExampleCreateOne: ExampleTC.getResolver('createOne'),
        ExampleCreateMany: ExampleTC.getResolver('createMany'),
        ...requireOwnershipForUpdate({
            ExampleUpdateById: ExampleTC.getResolver('updateById'),
            ExampleUpdateOne: ExampleTC.getResolver('updateOne'),
            ExampleUpdateMany: ExampleTC.getResolver('updateMany'),
            ExampleRemoveById: ExampleTC.getResolver('removeById'),
            ExampleRemoveOne: ExampleTC.getResolver('removeOne'),
            ExampleRemoveMany: ExampleTC.getResolver('removeMany'),
        }),
    }),
};
In just 14 statements we have defined almost all general operations that you’d need to do on most of your models. Isn’t this just amazing? More such magic tricks, some of which are below, have been discussed in the official docs in more detail.
requireAuthenticationandrequireOwnershipForUpdateare two resolver middlewares that limit access to only authenticated users and owner of the document respectively for the operations enclosed within them.
Writing Custom Operations
At times, we may require adding mutation or query that isn’t common but specific to our purpose. This can be easily; below we have added a login mutation to the Example model. First, we write the required method to handle the mutation.
const makeLoginResolver = function (ExampleTC, Example) {
    return {
        kind: 'mutation',
        name: 'login',
        args: {
            email: 'String!',
            password: 'String!',
        },
        type: ExampleTC.getResolver('updateById').getType(),
        resolve: async ({ args, context }) => {

            let example = await Example.findOne({ email: args.email });

            if (!example) {
                throw new Error('Example does not exist.');
            }

            const isEqual = await example.validatePassword(args.password);
            if (!isEqual) {
                throw new Error('Password is not correct.');
            }

            example.token = _createJWT(example);
            return {
                recordId: example._id,
                record: example,
            };
        },
    };
};
As can be seen above, the object to handle mutation (or query) needs to have the fields: “kind”, “name”, “args”, “type” and “resolve”. I believe “kind”, “name” and “args” are self-explanatory; “type” refers to the default mutation that the mutation resembles the most in terms of behavior and “resolve” defines your method of how you want to handle the operation. Once this is done, all we need to do is add it to our ExampleTC.
ExampleTC.addResolver(makeLoginResolver(ExampleTC, Example));

const ExampleMutation = {
    exampleLogin: ExampleTC.getResolver('login'),
};
That’s it! We have our login mutation added in so few lines of code!
Building Nesting Relations
Another common scenario is when you want to have access to your related documents (such as created_by in an upload) within the same query. A very simple way to implement the same is available in graphql-compose-mongoose with a few “template” lines of code.
UserTC.addRelation(
  'friends',
  {
    resolver: () => UserTC.getResolver('findByIds'),
    prepareArgs: { // resolver `findByIds` has `_ids` arg, let provide value to it
      _ids: (source) => source.friendsIds,
    },
    projection: { friendsIds: 1 }, // point fields in source object, which should be fetched from DB
  }
);
Breaking down the above statements; “resolver” handles how you want to find the related documents, “prepareArgs” are the arguments that would be passed to the resolver, and “projection” is the fields in the original document that needs to be fetched to prepare arguments. Isn’t it a cakewalk?
Restricting Access
This is one of the most used features; resolver wrappers. They are methods that are executed before the actual execution of the default endpoint logic (mutation or query, since endpoint is the same for all calls in GraphQL) and can be used to modify request parameters, arguments, or verify.
// middleware for resolvers which require authentication for access
var requireAuthentication = function (resolvers) {
    Object.keys(resolvers).forEach((k) => {
        resolvers[k] = resolvers[k].wrapResolve((next) => async (rp) => {
            if (!rp.context.req.isAuth) {
                throw new AuthenticationError('You must login to access this query.');
            }
            return next(rp);
        });
    });
    return resolvers;
};

// and wrap the resolvers
schemaComposer.Mutation.addFields({
  createResource: ResourceTC.getResolver('createOne'),
  createResources: ResourceTC.getResolver('createMany'),
  ...requireAuthentication({
    updateResource: ResourceTC.getResolver('updateById'),
    removeResource: ResourceTC.getResolver('removeById'),
  }),
});
In the above code snippet, we have restricted access to updateResouce and removeResource only to the logged in users which we check by if the isAuth flag is true in the request. This is not an authentic method but the point is to convey how to verify for authentication.
Conclusion
I had lots of fun writing GraphQL and it was a steep learning curve. One particular aspect I noted is the trap of wanting to do everything with GraphQL and it can be particularly taxing; there are numerous actions that are very easy to implement using REST. Hence, I found that for the fastest development cycle, it is very important to use discretion and use REST or GraphQL accordingly.
It’s pretty easy to use the latest technologies and make your code complex; it’s equally easy to use it with existing ones and make your code simpler!
If you have used GraphQL, do share your experience and thoughts about it ![]()

I'm intrigued by human psychology and code backend for videogames. I live with a philosophy to be simple, true, and kind always. I enjoy taking days slowly and writing when I learn something new - ah! that reminds me, I enjoy learning from new experiences a lot.